Getting your Lucky Little Learners All Access Membership organized with Google Drive can be a real lifesaver. It’s all about keeping things simple and easy to find when you need them most. Let’s walk through some quick and effective tips to help you set up Google Drive so your teaching resources are always just a click away. You’ve got this!
Table of Contents
1. Make Your Google Drive Folder System Work for You
Big Folders First:
Start by setting up main folders for each subject or grade level. Think of these as your go-to spots for everything you’ll need.
Organize Within:
Inside those main folders, create smaller folders for units, themes, or specific topics. For example:
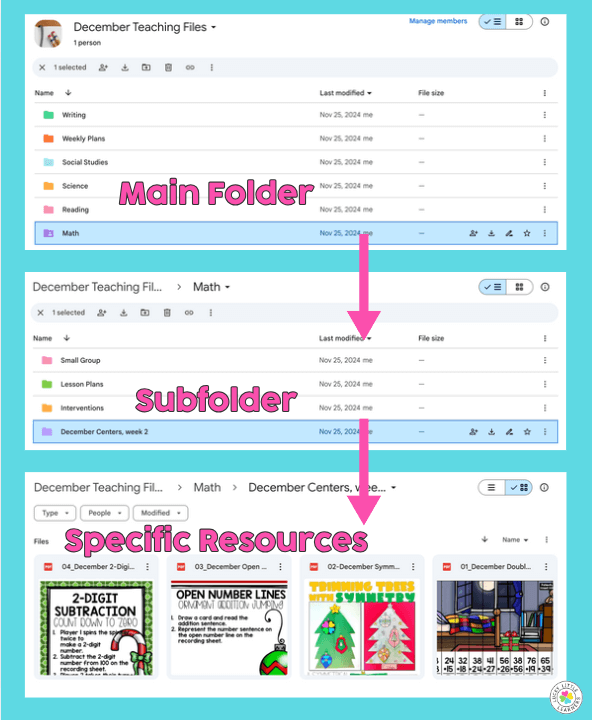
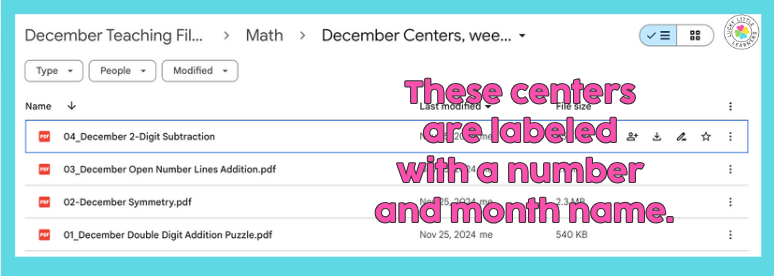
- Main Folder: December Teaching Files
- Subfolder: Math
- Even More Folders: December Centers, Week 2
- Subfolder: Math
This way, everything has a home, and you’ll know exactly where to find what you need—no more hunting around in the middle of prep time!
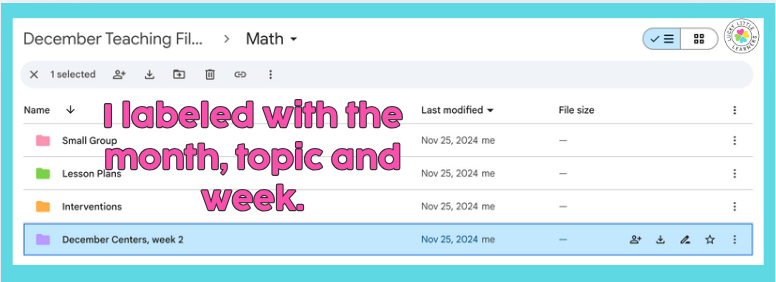
Choose a Naming Convention
Let’s stick with clear and consistent names so everything stays simple and easy for all of us. Keeping things straightforward means no one gets lost along the way!
Idea #1: Add Grade Levels and Topics to File Names
When naming your files, be clear and descriptive. Instead of something generic like “Math Lesson,” try using “2nd_Grade_Addition_Lesson_Plan.” This way, you can quickly spot what you need, even when juggling lessons across different grades. It’s all about keeping things simple and making your busy day a little easier!
Idea #2. Include Key Information
Add grade levels, subjects, or topics to your file names to make them easier to find when you need them most!
- Consider these elements:
- Grade Level: Clearly state the grade (e.g., “1st Grade”).
- Topic or Subject: Specify the focus (e.g., “Phonics”).
- Date: Add the date in a sortable format, like YYYY-MM-DD.
- Or simply list the time of year or season you wish to use the resource for your own organization.
Idea #3: Put Important Files Front and Center
For the resources you use all the time, try adding a simple prefix, like a number or letter, to keep them at the top of your folder. It’s a quick trick to save time and keep your go-to files right where you need them!
Example:
- “01_Lesson Plans”
- “A_MorningMeetingSlides”
This method is perfect for quick access without scrolling through all your files.
2. Tips for Getting Your Digital Files Organized
Keep things simple with these practical tips to save time and find what you need in a snap!
Tip #1: Set Up a Simple Folder Structure
Think of your folders like your classroom bins—each has its purpose!
- Start Big, Then Narrow Down: Begin with main folders for subjects or grades (e.g., “1st Grade Reading” or “2nd Grade Math”). Think about how you naturally plan lessons and group your materials.
- Be Creative with Subfolders: Inside those main folders, create subfolders that match how you teach. For example:
- “Unit 1: Addition” for math.
- “Morning Work Activities” or “Holiday Crafts” for ELA and seasonal work.
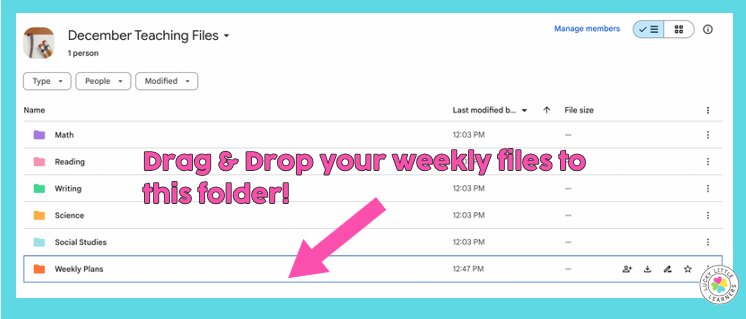
Just for Teachers:
Make a “Weekly Plans” folder where you copy all the files you need for the week. It’s like having your materials prepped and ready on your desk, only digital!
Tip #2: Add Color Coding and Tags
Add Some Color: Use color coding to make folders stand out by subject or priority.
Make it easy on yourself to find what you need with a pop of color and clear labels:
- Color-code folders:
Right-click on a folder > Click “Change color.” Use colors to group by subjects (e.g., blue for Math, green for Science). - Name files and folders clearly:
Start with keywords like “Lesson Plan” or “Student Work.” Avoid vague names like “Untitled Document.”
Tip #3: Utilize Shortcuts
For files that fit multiple subjects or grades, create shortcuts in the right folders instead of making duplicates. It keeps your Drive tidy and makes finding what you need a breeze!
Tip #4: Use Optimized Searching Techniques
A few simple tricks can make finding what you need fast and stress-free. Try these ideas to keep your Drive tidy and your day running smoothly!
a) Keyboard Shortcuts
Here are some simple search shortcuts:
- Quickly create a new document, sheet, or slide:
Type the following into your browser’s address bar:doc.newfor Google Docssheet.newfor Google Sheetsslide.newfor Google Slides
- Organize files fast:
- Select a file or folder and press
Shift + Zto add it to multiple folders (perfect for files you use in different subjects).
- Select a file or folder and press
- Search like a pro:
UseCtrl + /(Windows) orCmd + /(Mac) while in Google Drive to see a full list of shortcuts!
These quick tricks can save you time and keep everything running smoothly!
b) Advanced Search
Finding files in a packed Drive is a breeze when you know these search tricks:
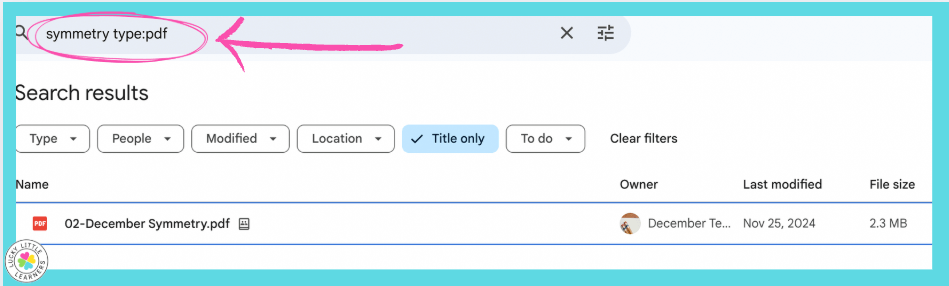
- Search by file type:
- Need a specific kind of resource? Use
type:pdfortype:docto filter your search.
Example: Searchingtype:pdf multiplicationbrings up all your multiplication PDFs.
- Need a specific kind of resource? Use
- Search within a specific folder:
- If your materials are organized by folder, include
folder:name_of_folderin your search.
Example:folder:math multiplicationonly looks in your Math folder for files.
- If your materials are organized by folder, include
- Search by date:
- Use
before:YYYY-MM-DDorafter:YYYY-MM-DDto find files created in a specific timeframe.
Example:after:2023-01-01finds anything added since January 2023.
- Use
c) Use Google Drive Add-Ons and Extensions
Try these tools to keep everything tidy and easy to find:
- Save to Google Drive Chrome Extension:
Save web content (like PDFs and lesson plans) directly to your Drive without downloading. - Drive File Stream:
Sync your Drive with your computer for quicker offline access.
d) Set Up a “Teacher Favorites” Shortcut
Set up a folder or shortcuts for the files you use most often—it’s a simple way to save time!
- Add a star to files or folders by right-clicking and selecting “Add to Starred.”
Access starred items by clicking “Starred” in the left sidebar.
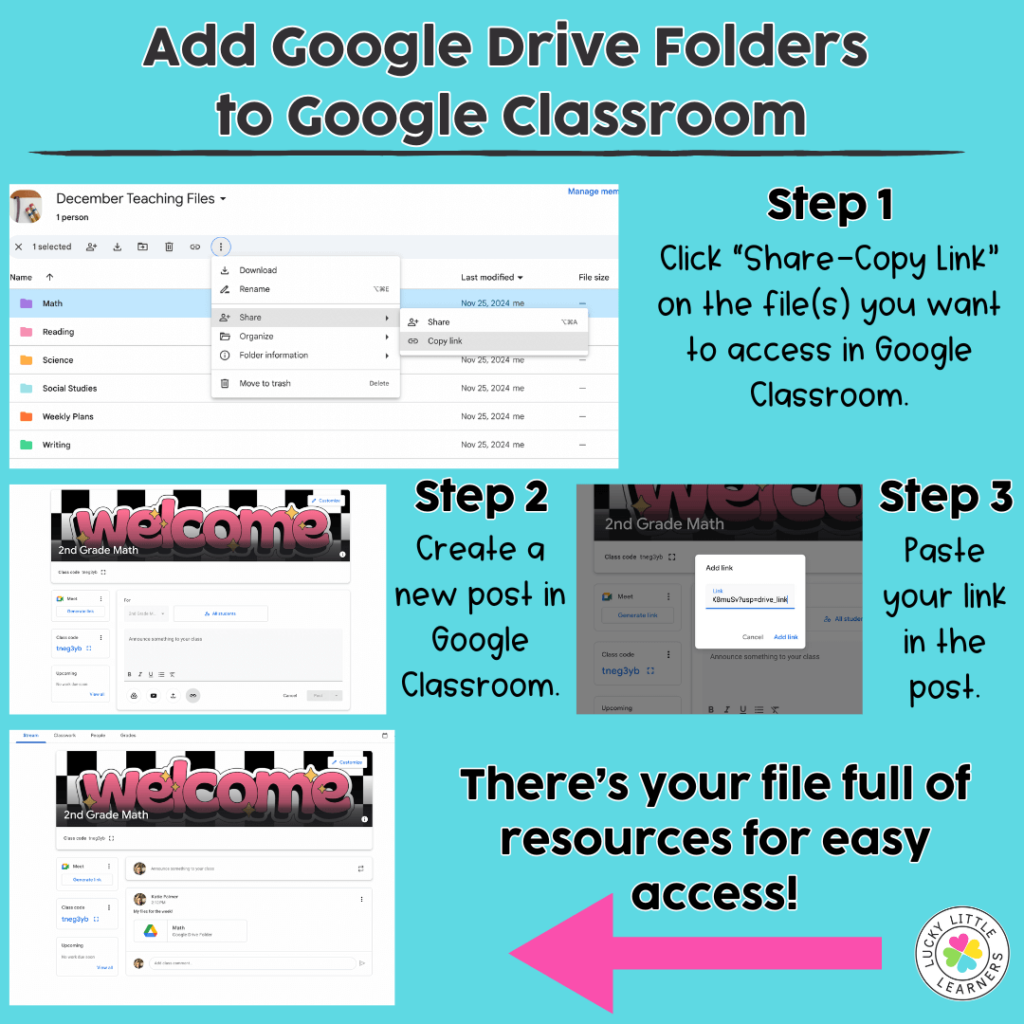
Tip #5. Linking Google Drive to other Virtual Tools
Connecting your Google Drive resources to virtual tools is a great time-saver! Here’s a step-by-step guide to linking with Google Classroom. You can also add quick access to your online lesson plans, like Planbook, to keep everything right at your fingertips.
Just for Teachers: Google Slides Tips & Tricks
If you’re loving Google Drive, you’re in for a treat! Google Slides are perfect for modern teachers to streamline lesson planning with interactive technology to deliver your lessons! Check out our post library on all things Google Slides.
By using these simple Google Drive shortcuts and search tips, you can transform the way you organize and access your teaching materials, saving precious time for what matters most—your students.
Ready to take your digital organization to the next level? Explore All Access, your ultimate partner for time-saving strategies, exclusive resources, and ready-to-use materials designed to simplify your teaching life! With everything you need just a click away, teaching has never been easier—or more effective.